13th November 2010 - Bodywork Second Fit

The answer to the question posed in the previous installment - how to get the bonnet to clear the air intake - was simple and rather low-tech:  Take off and cut down the pipe between the intake and the throttle body.  It worked - with about 10mm taken off the top of the pipe and some cut-outs to make it sit lower on the throttle body we can now see daylight over the top of the intake when the bonnet's on:

Intake pipe as supplied
 
Shortened intake pipe
We then moved on to the throttle cable linkage - one of the "come back to" jobs we'd been putting off because it wasn't obvious how to do it.  A photo from Mark at Westfield made it clear that it, in fact, was obvious once we'd found another "I wonder what that's for?" part in the box of nuts and bolts:
Throttle cable attached - obvious once you see it in place!
Next on the list was to finish checking the panel alignment prior to fastening the main tub on and cutting the hole for the exhaust.  Everything, including the nose cone, fitted perfectly after a bit more trimming of the scuttle........ except for the trailing edge of the bonnet on the offside sitting slightly too high and wide.  Whilst it seems like a small problem, we suspect we might need to go "back to basics" to sort it out.  One to leave for another day, although we did take a picture during the process:
Bodywork trial fit 2.  Wheelarches rested in place for effect!
With that issue parked, we started thinking about the engine wiring, the first part of which was how to route the wires from the ECU to the engine.  We'll be taking advice from Westfield, but the "cleanest" route seems to be through one of the holes on the gearbox top panel, so in preparation for this we enlarged the gear lever hole so that the gaiter fits (and 1st/3rd/5th gears are selectable!).  We then re-mounted the ECU so that the wires exit in the right direction, making space for the relays in the process:
ECU and relays mounted on hinged plate above passenger footwell
Dark now, and getting cold, so called it a day.

30th October 2010 - Bodywork first fit

We started the day by fiinally getting the fuel pump re-positioned.  More troubles with rivnuts saw us change to a bolt through the chassis member - at least it'll be secure.

With that done, we could resist the temptation to start to fit the bodywork no longer.  The older manual says the rear wheelarches need to be fitted first, but the more recent ones and other build diaries seem less precious about this, so we pressed ahead without - we can always take the body tub off again if necessary.  The main section went on easily and seem to position itself naturally with the correct 40cm gap between the back of chassis member at the back of the seats and the back of the "boot" (aka rear glove box) aperture.  We then wasted no time in resting the scuttle and bonnet in place - wow!

Bodywork first fit - starting to look like a car!
The scuttle needed a cut-out about 2cm up the front edge to make it clear the steering column - chain drilled then filed  - and a small cut out on the return edge the other side to clear the wiring loom as it comes up through the bulkhead.  It now fitted perfectly and lined up with the main tub.

Matthew and Grandad look impressed - maybe.
The bonnet went on next, but wouldn't quite sit down correctly on the offside - the air intake was lifting it up by about 6mm.  Hmmm... a call to Westfield on Monday coming up.  Shame - it was going so well.
"Boot" area with clamps on the roll bar area to hold the body tub in place

23rd October 2010 - Bits & bobs and the fuel pump (again)

As we've said in previous posts, we're aiming to get the bodywork on before Winter, but there are a few jobs that'll be easier to do without it on.  The aim today was to get those done, but it didn't quite work out that way:

We started by trying to work out where the cooling system hoses will go - certainly not where the standard manual says!  It looks like the recently-acquired "Aerorace" manual is the best bet, although it won't be exactly right as that model has no heater.  Anyway, we fitted the pipes between the bottom connection on the radiator and the water pump before realising that the rest of the pipework will be best done after the exhaust manifold has its final fitting..... which can't be done until after the bodywork's on!

So we moved onto the clutch cable, which was relatively easy once we'd removed the pedal pivot to provide some extra travel on the inner cable so that the grommet on the clutch arm could be pushed over it before being re-fitted to the arm.  We now appear to have a working clutch:


Clutch cable through the grommet in the actuator arm
  Next up was the long-awaited bracket for the speedometer transducer (the manual said it should have been welded to the chassis, but it was missing).  The bracket went on nicely once we'd put a couple of rivnuts in the chassis, but we're not convinced it puts the transducer near enough to the driveshaft bolts it'll need to "sense" as they turn to work out the speed.  We tried to bend the bracket, but it's tougher than any of the vices we have, so we'll have to have another go it if it turns out to be a problem.

Transducer above the RHS driveshaft bolts
We then made up a template for the hole we'll need to make in the side of the body for the exhaust manifold to go through.  Not looking forward to that job!

Template for the exhaust manifold hole made from the radiator box
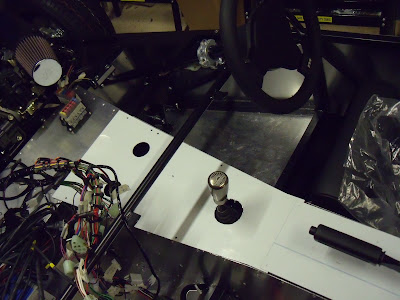
We also made the gearlever hole in the aluminium plate that will cover that area.  It'll need enlarging, but we wanted to put it in place so we can work out which holes will be used for the engine wiring.

G
Gearbox cover plate in (temporary) place
 We then went back to the fuel pump and decided that it would definitely need the bracket turing around to allow a straighter run for the fuel pipes.  This turned out to be easier said than done, as one of the new rivnuts refused to lock in place properly despite numerous attempts.  We need to find a way of tightening it up.... next time.

11th October 2010 - Fuel Pump & Filter

A rare evening visit to the garage trying to make the most of the daylight and relative warmth before the winter.  Tonight the target was the fuel pump and filter abandoned previously due to mounting point uncertainty.  Following yet more advice from Westfield, we used rivserts again - two under the right-hand driveshaft for the filter, two more just to the right of the diff stabiliser bracket for the pump.  Both items had been prepared previously, including changing the connectors on the wiring loom, so mounting them was quite straightforward, if a little time consuming due to the cheapo bent-alumminium brackets.  These required the rivserts to be done one at a time to ensure they were in the right place. 

Once on, the fuel pipes from the filter  to the under-car fuel line, from the filter to the pump and from the pump to the tank were addded:
Fuel pump & filter in place (pipes and cables still to be covered)
When we reviewed the job upon completion, we think the fuel pump bracket should be the other way around, placing the pump under the tank.  This would make it a bit more vulnerable, but the pipe runs would be straighter.  One to think about for next time.

9th October 2010 - Radiator & Battery tray

Now we've received the correct 6mm bolts from Westfield we set about fitting the radiator.  First we fitted the fan switch, then mounted the fan to its frame, then bolted the whole assembly to the lower brackets on the chassis.  Other build diaries mention having to bend the brackets, but ours were fine - I guess Westfield have improved them.  It was then simply a matter of pop-riveting the top brackets to the chassis - no problem to old hands at pop-riveting like us!  With the radiator in place, the car looks even more like it might be on the road sometime next year:

Radiator in place
Whilst fitting the radiator, we also fitted the lower bracket for the nose cone (visible below the radiator in the picture above).  It was whilst doing this that we noticed that the chassis rails below the steering rack seemed to make a shape simlar to a mystery piece of trapezium-shaped aluminium we had sitting on the side.  Sure enough, it was an exact fit - even having holes to fit over the nose-cone bracket.  Once fitted, this solved the outstanding problem of how to mount the battery tray - shame this wasn't mentioned in any of the manuals or by the Westfield helpline when asked where the battery should be fitted!
On a roll now, we used our newly acquired "rivsert" tool to put a rivnut in the chassis for the battery strap to bolt into, a couple more pop rivets to hold the back of the battery tray and job done:

Battery tray and strap in place on top of the "mystery" piece of aluminium
To finish the afternoon off, we fitted the hinged plate for the ECU above the passenger footwell
(another missing part recently requested).  Based on other build diaries, we cut it down by about an inch to leave more space for the heater:
ECU Mounting plate
The list of pre-body jobs is now getting smaller (but still includes the engine wiring!)

15th September 2010 - Exhaust manifold (but not much else!)

Today was a really frustrating day, notable more for the things we couldn't do rather than those we could:
1.  We still couldn't fit the fuel pump or filter as Westfield say we need a rivnut insertion tool (to insert captive nuts) - which we've had to order from Amazon as no-one stocks one locally at a reasonable price
2.  We tried to fit the radiator and fan assembly, but found that the bolts supplied are 5mm rather than 6mm and longer 6mm bolts would put a hole in the radiator (which would not be good!)
3.  We tried to fit the battery tray, but the "pre-fitted rivnuts" in the chassis are notable by their absence.

Not wanting to wade into the engine wiring loom without preparation, we were left with a few minor bits and pieces;  Firstly the horn (wow!) and the VIN plate (yes, we're getting desperate now).  Then we put the exhaust manifold on - mainly because its visible progress, even though it will have to come off again to fit the body.  At least it seems to fit well and clears everything and we'll be able to make a template for where the hole in the body will need to be.


The biggest success of the day ended up being the fitting of a part which should have gone on ages ago - the handbrake warning switch.  We finally worked out how it goes on and managed to find a couple of suitable bolts at the village hardware store (there were none the right size in the dwindling box of bolts).

Other than the jobs we failed to do, we think there's just the engine wiring and ECU to do before we start thinking about fitting the body.... although with all the setbacks and winter approaching, that may not now be until next year.

18th September 2010 - Fuel Tank

After last week's events, this week was slightly lower key.  The first things to do were to re-fit the gear lever after putting some grease on the rather dry-looking selector and to torque up the rear wishbone bolts (some of which will be inaccessible when the fuel tanks on).  The tank itself was fairly straightforward, requiring the fitting of the outlets using PTFE tape on the threads before putting foam tape everywhere it'll touch and fastening it down with aluminium straps.

Fuel tank in place
Next on the list was adding some rubber fuel pipes - one for the breather from the top of the tank to the top of the chassis, the second from the return (copper) fuel pipe to the tank.  Then it was time to prepare the fuel pump and filter, including changing the loom (spade) connections for round ones.  That done, it was time to fit them;  except where the instructions say they should be fitted would require drilling right though the chassis box section, but if we did there would be no suitable bolt.  Another one for Westfield I think - they need chasing about the transducer bracket anyway!  Frustrated at another time-wasting setback, we tried the scuttle in place to see how it looks:
Looks even more like a car with the scuttle on
As a final task we started fitting up the radiator and fan, but didn't put the assembly on the car as the radiator looks so fragile.  One for just before the nose goes on I think.