October 15th 2012 - Cycle wing & exhaust heat shield

Cheap drill bits are a false economy.  Last weekend I wasted a couple of hours attempting to drill through the cycle wing brackets with limited success.  Onto Amazon for a next day delivery of a couple of cobalt drill bits (as used for the chassis panelling but 5.5mm rather than 4) and the 6 remaining holes took no more than 15 minutes!  They were then bolted back on, the wheel removed and some holes drilled through the taped in place wings after adding a strip of foam cushioning.  Some people use bonded in bolts to avoid having visible bolt heads, but I decided that it would be more important to have confidence they're not about to fall off.  To reduce the risk of cracking of the wings I used some slightly bigger washers:

Fitting the nearside wing will have to wait as I noticed the powdercoating was loose around the mounting holes on the bracket and scratching it away revealed some rust.  A quick coat of Hammerite will sort it, its just a bit annoying not to be able to finish the job.

Not disheartened though, I decided to fit the exhaust heat shield - as much as to get the parts out of the way as anything.... and it seemed like a nice simple yet highly visible job.  And so it turned out to be - just a case of opening up the two huge jubilee clips, feeding them through two channels on the inside of the heat shield and fastening the clips up again.

Note the absence of the scuttle in this picture - its still on the bench awaiting fitment of the wiper motor.  More on that soon I hope.

September 3rd 2012 - Cycle wings & Exhaust

After visiting the Donington Park Kit Car Show at the weekend, I realised that fitting the cycle wing brackets was easier than I had previously thought - simply bolting on to three threaded holes in the upright rather than taking the upright apart.... once the correct side bracket was used!  Not sure how I missed that, but fitting them was then a 5 minute job, which Matthew actually did!  I then taped the wings in place and rolled the car outside to check positioning:
Front wings held in place with masking tape.  Scuttle still off the car in the midst of wiper motor fitting.

With limited time before a go-karting evening, we left the bolting on of the wings to another day and trial fitted the exhaust:

Shiny!  (Matthew had given up helping by this point in favour of trying the driving position!)
Whilst at the show, I took the opportunity to ask Westfield about the forthcoming issue with the gear lever hitting the dashboard.  The answer was (for once) that I hadn't done anything wrong and it is a known issue with this engine/gearbox combination.  The solution is a not-very-subtle one:  Put a bar over the lever and bend it back.  Another job for another day.

August 27th 2012 - Demist Vents

I decided that the fitting out of the scuttle could be postponed no longer, so off it came after first detaching the windscreen, making the build look like its going backwards.  After the now-traditional masking of the working area, I chain-drilled and filed the moulded windscreen demist slots in the scuttle top.  The manual says it should be 4mm wide, but since my narrowest file is 5mm, that's what they are.
demist slots cut in scuttle-top
Next came the moulded hot air funnel (can't remember the official name) which directs air from the heater to the demist vents.  This fits "naturally" on the inside of the scuttle and the manual says it should be attached with glass-fibre "or similar".  Not wanting to get messy with resin, I decided to try some two-pack epoxy I found in the end-of-line bargain bucket at work.  This is really strong stuff and waterproof and seems to have done the job really effectively.  When its fully cured, I'll run some silicone around the edges to seal it.
Demist "funnel" attached inside the scuttle

Epoxy glue used to attach the funnel - seems really good

August 18th 2012 - Exhaust mounting bracket

Easing back from hols with some simple jobs, I enlarged the passenger seat mounting holes to allow it to move inward a fraction.  It still seems a very tight fit if it is to move backwards and forwards without fouling on the tunnel or the bodywork.
While the seat was out I drilled through the threaded hole in the chassis to which the exhaust bracket is attached using a 4mm drill bit to avoid damaging the threads.  It was then a relatively simple matter of enlarging the hole from the outside to accept the tube which goes around the bolt.  The hardest part was finding all the right bits and assembling them in the right order.  Due to the number of parts, the end result looks a bit of a botch up, but at least it'll be hidden behind the exhaust:
5 separate parts (plus bolts) to mount an exhaust silencer!
Although tempting, I decided not to fit the exhaust yet, as it could get in the way whilst fitting the dash etc.

July 2012 - Holiday

No progress on the car in late July/early Aug due to travels in France and Belgium, one of the highlights of which was a trip to the Spa-Francorchamps circuit with its awe-inspiring Eau-Rouge/Radion corners.  The steepness of the climb has to be seen to be appreciated!  This is mentioned here, as Matthew and I have decided that we'll be taking the Westfield around the circuit when its finished.

Eau Rouge/ Radion is steeper than it looks in photos or on TV

July 16th 2012 - Finally shifted the gearbox filler plug!

Finally, after many attempts and the purchase of some allen driver bits, the gearbox filler plug budged.  I've mentioned earlier that I've made a hole in the passenger footwell to fill the gearbox without the need to access it from underneath, now with the help of a metal tube on the end of the socket bar it gave in.  Filling the 'box was then really easy, as the standard bottle neck was just long enough:
Filling the gearbox via the passenger footwell
There's some debate on line as to which oil to use in a Ford Type 9 gearbox, but the majority seem to agree that it should be the automatic gearbox oil that Westfield supplied with the kit.

Whilst on a roll, and with about 30 mins left, I decided to fit the number plate light:  20 minutes deciding where to mount it, 10 to drill the three holes and attach it.  The location was chosen to allow either a rectangular or square plate to be fitted.  Haven't wired it in yet as the cable needs shortening and a plug attaching.
Number plate light fitted with the aid of an old plate


June 28th 2012 - Windscreen & Fuel Filler

I can't believe how long the car's been home without making any significant progress (All I'd done was to fit the mirrors onto the windscreen frame).  However, the arrival of the Olympic Torch in the village prompted a day off work - half of it to be spent working on the car.

The build manual says that the wiper system and heater should be fitted into the scuttle before the windscreen goes on, but I wanted to put it on now for several reasons:
  1. It would be easier and safer to drill the mounting holes with nothing in the way underneath
  2. It wouldn't be difficult to remove again to take the scuttle off
  3. It would be really visible progress to spark the enthusiasm
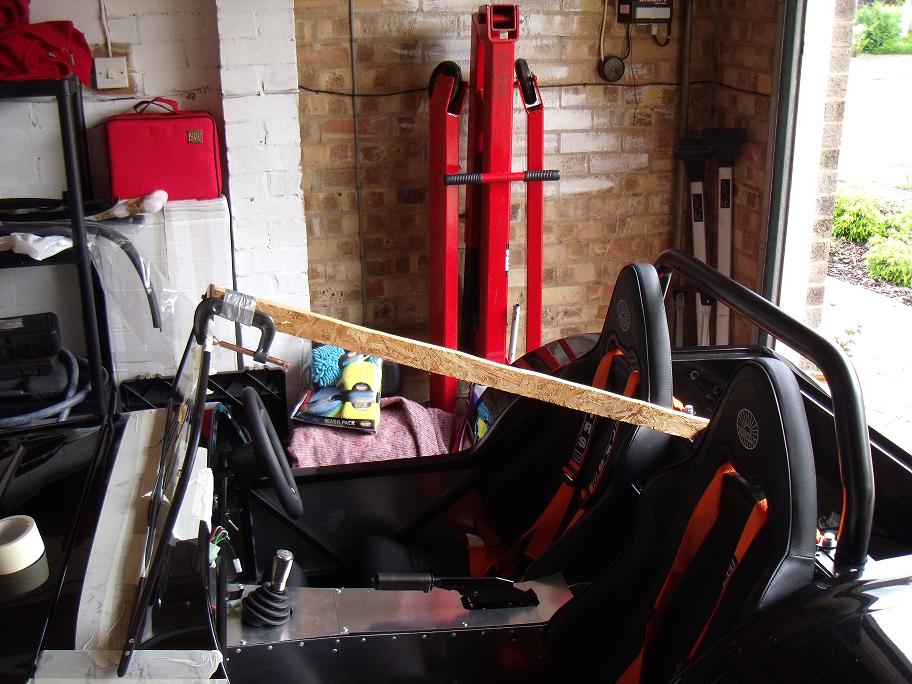
I started with making up a pole with a G-clamp attached at each end to allow the screen to be clamped in place the required 1007mm from the rear bulkhead.  The screen was then attached to this after the masking up the area to be worked on.  Masking tape was also used to prevent the base of the screen from slipping out of its moulded channel.  The two windscreen pillar/mirror assemblies were then offered up, the best position found and mounting holes marked and drilled.  It was then simply a matter of bolting them on and joining the posts to the screen with grub screws.  All in all, easier than expected:


I haven't decided whether to make holes for the heated windscreen cables yet, as Westfield seem to assume that you either have a (optional extra) heater or use the heated windscreen as there's only space for one switch on the dashboard.  I'll probably run the wires anyway and maybe make another hole for the switch, as I'm intending to make one for a 12v socket anyway.


Flushed with success, and still with a couple of hours before the start of Torch festivities, I decided to make a start on fitting the fuel filler cap and associated pipework.  I started by cutting the filler pipe down a bit so it would fit, making sure to leave it long enough for it to be located with jubilee clips, but short enough so it could be fitted in quite a tight space.  This allowed me to trial fit it and accurately mark the hole to be drilled in the bodywork.  Once again, this was chain-drilled over-cautiously, requiring a LOT of time-consuming filing to make the hole large enough. Once done, assembly and mounting of the cap and pipework was straightforward.  Other than a bit of pushing and wiggling, all that was required was six small holes and to tie the cap retaining cable.  Neat.


Some significant progress at last then, prompting a "doesn't it look almost finished" photo opportunity once the rain had stopped: