11th October 2010 - Fuel Pump & Filter

A rare evening visit to the garage trying to make the most of the daylight and relative warmth before the winter.  Tonight the target was the fuel pump and filter abandoned previously due to mounting point uncertainty.  Following yet more advice from Westfield, we used rivserts again - two under the right-hand driveshaft for the filter, two more just to the right of the diff stabiliser bracket for the pump.  Both items had been prepared previously, including changing the connectors on the wiring loom, so mounting them was quite straightforward, if a little time consuming due to the cheapo bent-alumminium brackets.  These required the rivserts to be done one at a time to ensure they were in the right place. 

Once on, the fuel pipes from the filter  to the under-car fuel line, from the filter to the pump and from the pump to the tank were addded:
Fuel pump & filter in place (pipes and cables still to be covered)
When we reviewed the job upon completion, we think the fuel pump bracket should be the other way around, placing the pump under the tank.  This would make it a bit more vulnerable, but the pipe runs would be straighter.  One to think about for next time.

9th October 2010 - Radiator & Battery tray

Now we've received the correct 6mm bolts from Westfield we set about fitting the radiator.  First we fitted the fan switch, then mounted the fan to its frame, then bolted the whole assembly to the lower brackets on the chassis.  Other build diaries mention having to bend the brackets, but ours were fine - I guess Westfield have improved them.  It was then simply a matter of pop-riveting the top brackets to the chassis - no problem to old hands at pop-riveting like us!  With the radiator in place, the car looks even more like it might be on the road sometime next year:

Radiator in place
Whilst fitting the radiator, we also fitted the lower bracket for the nose cone (visible below the radiator in the picture above).  It was whilst doing this that we noticed that the chassis rails below the steering rack seemed to make a shape simlar to a mystery piece of trapezium-shaped aluminium we had sitting on the side.  Sure enough, it was an exact fit - even having holes to fit over the nose-cone bracket.  Once fitted, this solved the outstanding problem of how to mount the battery tray - shame this wasn't mentioned in any of the manuals or by the Westfield helpline when asked where the battery should be fitted!
On a roll now, we used our newly acquired "rivsert" tool to put a rivnut in the chassis for the battery strap to bolt into, a couple more pop rivets to hold the back of the battery tray and job done:

Battery tray and strap in place on top of the "mystery" piece of aluminium
To finish the afternoon off, we fitted the hinged plate for the ECU above the passenger footwell
(another missing part recently requested).  Based on other build diaries, we cut it down by about an inch to leave more space for the heater:
ECU Mounting plate
The list of pre-body jobs is now getting smaller (but still includes the engine wiring!)

15th September 2010 - Exhaust manifold (but not much else!)

Today was a really frustrating day, notable more for the things we couldn't do rather than those we could:
1.  We still couldn't fit the fuel pump or filter as Westfield say we need a rivnut insertion tool (to insert captive nuts) - which we've had to order from Amazon as no-one stocks one locally at a reasonable price
2.  We tried to fit the radiator and fan assembly, but found that the bolts supplied are 5mm rather than 6mm and longer 6mm bolts would put a hole in the radiator (which would not be good!)
3.  We tried to fit the battery tray, but the "pre-fitted rivnuts" in the chassis are notable by their absence.

Not wanting to wade into the engine wiring loom without preparation, we were left with a few minor bits and pieces;  Firstly the horn (wow!) and the VIN plate (yes, we're getting desperate now).  Then we put the exhaust manifold on - mainly because its visible progress, even though it will have to come off again to fit the body.  At least it seems to fit well and clears everything and we'll be able to make a template for where the hole in the body will need to be.


The biggest success of the day ended up being the fitting of a part which should have gone on ages ago - the handbrake warning switch.  We finally worked out how it goes on and managed to find a couple of suitable bolts at the village hardware store (there were none the right size in the dwindling box of bolts).

Other than the jobs we failed to do, we think there's just the engine wiring and ECU to do before we start thinking about fitting the body.... although with all the setbacks and winter approaching, that may not now be until next year.

18th September 2010 - Fuel Tank

After last week's events, this week was slightly lower key.  The first things to do were to re-fit the gear lever after putting some grease on the rather dry-looking selector and to torque up the rear wishbone bolts (some of which will be inaccessible when the fuel tanks on).  The tank itself was fairly straightforward, requiring the fitting of the outlets using PTFE tape on the threads before putting foam tape everywhere it'll touch and fastening it down with aluminium straps.

Fuel tank in place
Next on the list was adding some rubber fuel pipes - one for the breather from the top of the tank to the top of the chassis, the second from the return (copper) fuel pipe to the tank.  Then it was time to prepare the fuel pump and filter, including changing the loom (spade) connections for round ones.  That done, it was time to fit them;  except where the instructions say they should be fitted would require drilling right though the chassis box section, but if we did there would be no suitable bolt.  Another one for Westfield I think - they need chasing about the transducer bracket anyway!  Frustrated at another time-wasting setback, we tried the scuttle in place to see how it looks:
Looks even more like a car with the scuttle on
As a final task we started fitting up the radiator and fan, but didn't put the assembly on the car as the radiator looks so fragile.  One for just before the nose goes on I think.

11th September 2010 - Engine & Lower Steering Column

After a break for summer activities, today was a big day - engine installation.  We started by lowering the car off its trestles so that it stood on the ground for the first time; We attached the engine crane to the rear of the chassis, lifted it to remove the rear trestle, then slowly lowered it whilst making sure the front trestle didn't fall over.  To our surprise it was possible to lower the rear almost to the ground before (manually) lifting the front and pulling out the front trestle.  Wow, you forget just how low to the ground these cars are!  We then decided to turn the car around to fit the engine, which required the second and third momentous occasions of the day - the first time the car rolled, and its first trip outside!


Rolling chassis ventures outside!
  Then came the first engine fitting - "first" because we knew from a preparatory measurement/comparison of mounting hole vs. gearbox mounting and a subsequent conversation with Westfield that we'd need to drill new mounting points once we knew where they go from the first trial fitting.
The installation itself went more smoothly than expected;  we removed the gear lever to make it easier, but then with a slow, repeating "back a bit, down a bit" routine everything lined up perfectly with no squashed pipes or cables in the process.  Getting the propshaft splines lined up with the gearbox took a bit of wiggling, but by then we were on a roll.


Engine in place!
  Still plenty of time left so we moved onto the lower steering column: We'd previously identified that the bracket didn't fit, but Westfield just advised us to "put it in the most suitable place and shorten the mounting plate to fit"!  This turned out to be just behind the engine mount, needing a new hole to be made in the bracket and two in the chassis.  Once done though, the column went together easily and cleared the engine by at least 10mm.  Engine and steering on one day - result!
Still more time available though, so we couldn't resist putting in the driver's seat for that "it really will be a car" feeling.  Although there are pre-drilled holes in the pre-fitted lowered floor pan, they were in the wrong place for our upgrade "Sport Turbo" seats (The name coming from the model they were designed for, not the Halfords boy racer pretensions the name might suggest).  We made the new holes for maximum adjustability, with the result that the seat will go far enough forward for Matthew to reach the pedals.

Matthew trying out the driving position
 A lot done in one day then.  We even had time left to tidy up the garage.

6th August 2010 - Bits & Pieces & Issues

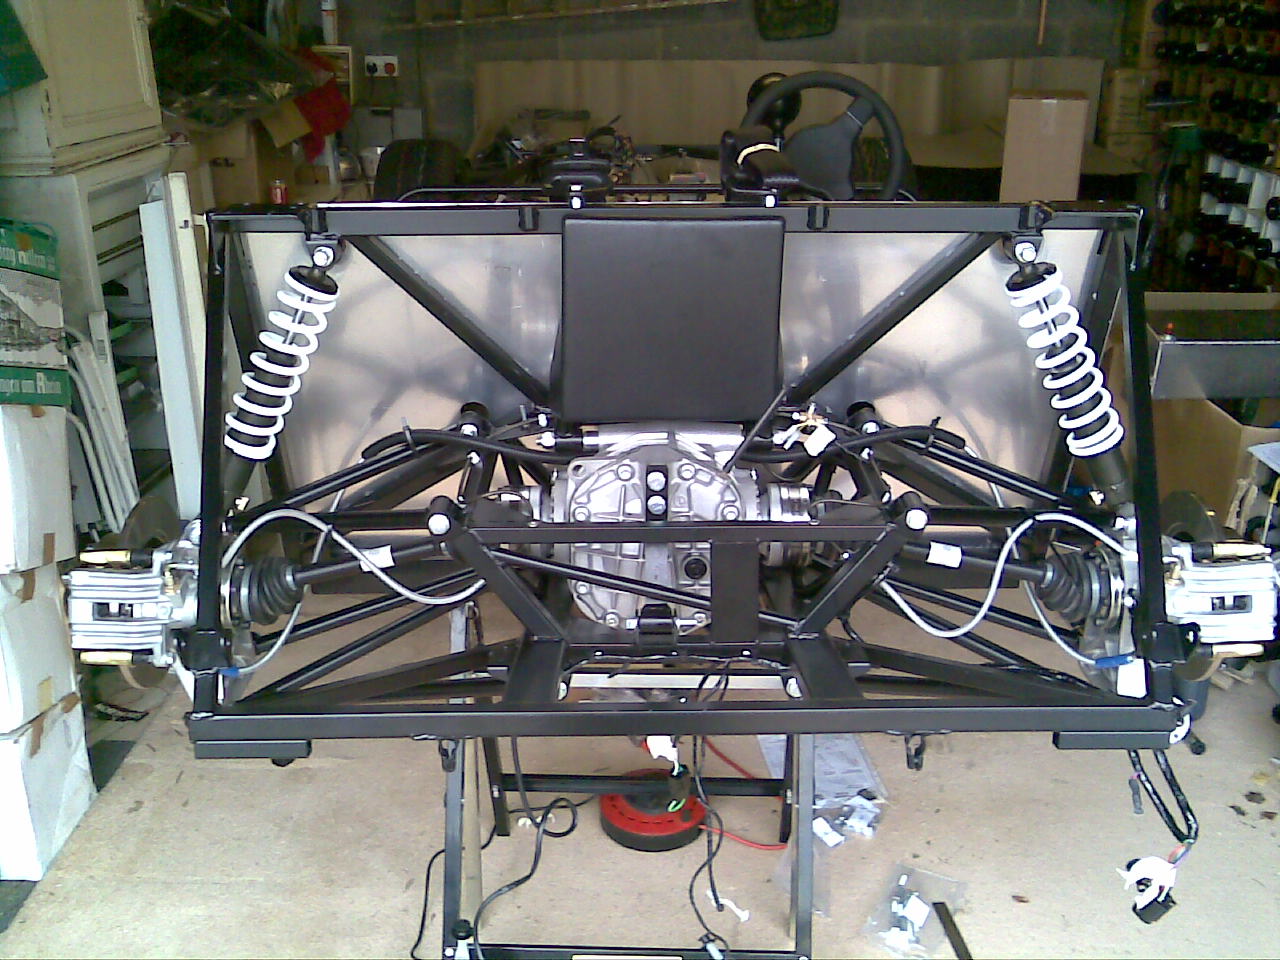
We're getting close to the engine installation now, but there are a few bits and pieces to complete first:  We put the flexible rear brake hoses and washer bottle on as well as finishing off the attachment of the wiring loom.  We also bolted on the seatbelts and the cover for them behind the rear bulkhead.  All fairly straightforward except we may re-do the rear part of the loom to locate it so there's no slack around where the gearbox will be.

Rear view showing flexible pipes and inertia reel cover
We also (finally and with help) tightened all of the balljoints and track rod ends and did some improvised wheel alignment.  Result!

Then came the problems:
1.  The mounting for the speedommeter transducer appears to be absent (could be a big problem!)
(Incorrect) Steering column bracket
2.  The bracket supplied to locate the lower steering column appears to be the wrong one as it cannot be fitted at the point on the chassis rail where its holes would suggest

3.  There's no obvious way of fitting the handbrake warning switch
4.  The bolts to attach the propshaft to the diff are waaaaay too long

Several calls to the Westfield technical helpline were met with a "we're busy" answerphone message, so we called the Sales number - to be told that "He's on holiday this week"!  That's alright then, we'll just put the build on hold until Westfield bother to staff up their helpline properly shall we?

Hopefully, that'll happen next week and we'll have some answers to probably the toughest questions we've had so far.  If we do, that'll leave the fuel tank, pump and filter to do before "E-day" (Engine fitting) - One of the events Matthew's been looking forward to the most.

17th July - Handbrake, Steering Column & More!

A "bits & bobs" day today:  First job was to torque up and "thread lock" all 24 driveshaft bolts with the aid of an old broom handle wedged between the hub studs to stop it turning. 
Attention then moved to fastening the fuse boxes down - there didn't seem to be any suitable fasteners supplied with the kit so we purchased some nuts, bolts & washers for 78p from Wilko - job done!  We then had to thread all the dashboard-related wiring through the other hole in the bulkhead top panel.  Simple enough, although a tip here is to pass the injection relays through first as they won't fit once the rest of the loom's through.

Fuse boxes and upper steering column
Handbrake next:  It turned out that (contrary to the manual) the handle mounting holes were already in the chassis.  It was then a matter of routing the cable, attaching it to the chassis mounting points then to the rear brakes, paying attention to the routing.  Still not convinced that it won't be affected by suspension movement, but I guess (hope) they must know what they're talking about.  N.B. The cable ties still need applying in this picture:
RHS Handbrake cable routing

Then it was just a matter of adding the clevis pin and adjusting the cable to what seems like it might be the right tension.  Looks like progress!  The instructions say to connect the handbrake warning switch cable at this point..... except there is no switch!  Found something in the bag of bolts which looks like it could be the switch, but its not apparent how to attach this to the handbrake - one for the technical helpline I think.
Handbrake with cable attached

Still some daylight left, so onto the upper steering column.  No hole in the bulkhead for this and loads of comments on the owners club forum about wrongly positioned holes, so we carefully held the trusty old broom handle against the mounting points, ensuring the aluminium spacer was in place too.  We then marked the place for the hole and chain-drilled a smallish hole.  Measured again and it still lined up, so we enlarged the hole gradually (trial fitting several times along the way) until the perfect result was achieved.  Phew!  Couldn't resist ending the day by fitting the steering wheel!
Upper steerng column