Not much build time today, but we did get the nosecone fitted: Two bolts into captive nuts just in front of the bonnet (making sure it all aligns still) and another at the front lower edge onto the bracket we fitted when the radiator went on. We bent the bracket up a bit to align better with the lower edge of the nosecone. Nice weather then prompted a photoshoot:
Whilst the car was outside we moved things around in the garage (now there are far fewer parts to store) and vacuumed the carpet (!). Not much progress, but while ever it keeps moving forward it WILL get finished!
5th February 2011 - Bodywork part 3
Good progress on the bodywork today.... although the photos look as though it hasn't advanced at all! First up was the offside rear wheel arch, which seemed to go on even quicker than the first. We then had another look at the bonnet-scuttle panel gaps and decided that any remaining misalignment would be sorted by fastening the body tub properly. On starting that task we quickly realised that the outer bolt for the steering column bracket was preventing the off side lower edge clipping around the chassis properly, so we had to make a cut-out:
The bodywork seemed to sit much better after that, so we fastened the upper edges in place using countersunk rivets.
The next, time consuming step was to attach the scuttle: The first part of this was to "find" the four rivnuts to fasten it to..... which isn't that easy when the bodywork's covering them! Luckily we'd foreseen this problem just before attaching the body, but making the 20mm cutouts without damaging the rivnuts was a bit of a challenge.
Then came the just as fiddly job of making corresponding holes in the lower edge of the scuttle and bolting through to the rivnuts - again done largely blind with a bit of guesswork thrown in. Worked out OK in the end though, even though it was a bit time-consuming:
Another day done and the car looks little different, but somehow more "together" for being held by bolts and rivets rather than gravity and g-clamps!
| Front offside lower bodywork in place |
The next, time consuming step was to attach the scuttle: The first part of this was to "find" the four rivnuts to fasten it to..... which isn't that easy when the bodywork's covering them! Luckily we'd foreseen this problem just before attaching the body, but making the 20mm cutouts without damaging the rivnuts was a bit of a challenge.
| Scuttle rivnut locations - off side |
| Offside scuttle mounting bolts |
8th January 2011 - Back in the garage - but not for long!
It doesn't seem like almost two months since we were in the garage. The coldest December on record followed by Christmas has seen to that. Talking of Christmas, Santa brought a set of bonnet locks, a brake bleeding kit and some Westfield goodies - good old Santa!
We eased ourselves back into car building with a nice simple task - fitting one of the rear wheelarches. These are self-locating via blocks in the GRP and although there were fewer of these than the build manual said there should be, this didn't cause a problem. We just spaced he fasteners equally:
That was just about enough for the first visit of the year, although we did get the bonnet to align better by filing down the return edge at the rear side edges. It may need a little more removing yet, but at least our worries about having to completely re-align the body were unfounded.
We eased ourselves back into car building with a nice simple task - fitting one of the rear wheelarches. These are self-locating via blocks in the GRP and although there were fewer of these than the build manual said there should be, this didn't cause a problem. We just spaced he fasteners equally:
| Rear Wheelarch Fastenings |
As suggested on the Owner's club forum, we used plastic number plate bolts purchased on eBay. The theory is that if you bash the arches they just shear off rather than damaging the much-harder-to-replace bodyshell. I suppose it might be true!
13th November 2010 - Bodywork Second Fit
The answer to the question posed in the previous installment - how to get the bonnet to clear the air intake - was simple and rather low-tech: Take off and cut down the pipe between the intake and the throttle body. It worked - with about 10mm taken off the top of the pipe and some cut-outs to make it sit lower on the throttle body we can now see daylight over the top of the intake when the bonnet's on:
We then moved on to the throttle cable linkage - one of the "come back to" jobs we'd been putting off because it wasn't obvious how to do it. A photo from Mark at Westfield made it clear that it, in fact, was obvious once we'd found another "I wonder what that's for?" part in the box of nuts and bolts:
Next on the list was to finish checking the panel alignment prior to fastening the main tub on and cutting the hole for the exhaust. Everything, including the nose cone, fitted perfectly after a bit more trimming of the scuttle........ except for the trailing edge of the bonnet on the offside sitting slightly too high and wide. Whilst it seems like a small problem, we suspect we might need to go "back to basics" to sort it out. One to leave for another day, although we did take a picture during the process:
With that issue parked, we started thinking about the engine wiring, the first part of which was how to route the wires from the ECU to the engine. We'll be taking advice from Westfield, but the "cleanest" route seems to be through one of the holes on the gearbox top panel, so in preparation for this we enlarged the gear lever hole so that the gaiter fits (and 1st/3rd/5th gears are selectable!). We then re-mounted the ECU so that the wires exit in the right direction, making space for the relays in the process:
Dark now, and getting cold, so called it a day.
![]() |
| Intake pipe as supplied |
![]() |
| Shortened intake pipe |
![]() |
| Throttle cable attached - obvious once you see it in place! |
![]() |
| Bodywork trial fit 2. Wheelarches rested in place for effect! |
![]() |
| ECU and relays mounted on hinged plate above passenger footwell |
30th October 2010 - Bodywork first fit
We started the day by fiinally getting the fuel pump re-positioned. More troubles with rivnuts saw us change to a bolt through the chassis member - at least it'll be secure.
With that done, we could resist the temptation to start to fit the bodywork no longer. The older manual says the rear wheelarches need to be fitted first, but the more recent ones and other build diaries seem less precious about this, so we pressed ahead without - we can always take the body tub off again if necessary. The main section went on easily and seem to position itself naturally with the correct 40cm gap between the back of chassis member at the back of the seats and the back of the "boot" (aka rear glove box) aperture. We then wasted no time in resting the scuttle and bonnet in place - wow!
The scuttle needed a cut-out about 2cm up the front edge to make it clear the steering column - chain drilled then filed - and a small cut out on the return edge the other side to clear the wiring loom as it comes up through the bulkhead. It now fitted perfectly and lined up with the main tub.
The bonnet went on next, but wouldn't quite sit down correctly on the offside - the air intake was lifting it up by about 6mm. Hmmm... a call to Westfield on Monday coming up. Shame - it was going so well.
With that done, we could resist the temptation to start to fit the bodywork no longer. The older manual says the rear wheelarches need to be fitted first, but the more recent ones and other build diaries seem less precious about this, so we pressed ahead without - we can always take the body tub off again if necessary. The main section went on easily and seem to position itself naturally with the correct 40cm gap between the back of chassis member at the back of the seats and the back of the "boot" (aka rear glove box) aperture. We then wasted no time in resting the scuttle and bonnet in place - wow!
| Bodywork first fit - starting to look like a car! |
| Matthew and Grandad look impressed - maybe. |
| "Boot" area with clamps on the roll bar area to hold the body tub in place |
23rd October 2010 - Bits & bobs and the fuel pump (again)
As we've said in previous posts, we're aiming to get the bodywork on before Winter, but there are a few jobs that'll be easier to do without it on. The aim today was to get those done, but it didn't quite work out that way:
We started by trying to work out where the cooling system hoses will go - certainly not where the standard manual says! It looks like the recently-acquired "Aerorace" manual is the best bet, although it won't be exactly right as that model has no heater. Anyway, we fitted the pipes between the bottom connection on the radiator and the water pump before realising that the rest of the pipework will be best done after the exhaust manifold has its final fitting..... which can't be done until after the bodywork's on!
So we moved onto the clutch cable, which was relatively easy once we'd removed the pedal pivot to provide some extra travel on the inner cable so that the grommet on the clutch arm could be pushed over it before being re-fitted to the arm. We now appear to have a working clutch:
Next up was the long-awaited bracket for the speedometer transducer (the manual said it should have been welded to the chassis, but it was missing). The bracket went on nicely once we'd put a couple of rivnuts in the chassis, but we're not convinced it puts the transducer near enough to the driveshaft bolts it'll need to "sense" as they turn to work out the speed. We tried to bend the bracket, but it's tougher than any of the vices we have, so we'll have to have another go it if it turns out to be a problem.
We then made up a template for the hole we'll need to make in the side of the body for the exhaust manifold to go through. Not looking forward to that job!
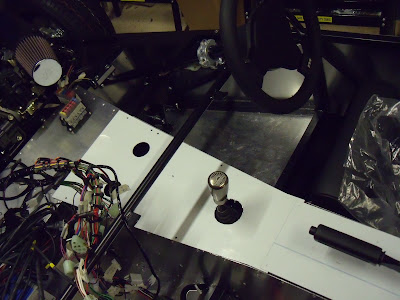
We also made the gearlever hole in the aluminium plate that will cover that area. It'll need enlarging, but we wanted to put it in place so we can work out which holes will be used for the engine wiring.
We then went back to the fuel pump and decided that it would definitely need the bracket turing around to allow a straighter run for the fuel pipes. This turned out to be easier said than done, as one of the new rivnuts refused to lock in place properly despite numerous attempts. We need to find a way of tightening it up.... next time.
We started by trying to work out where the cooling system hoses will go - certainly not where the standard manual says! It looks like the recently-acquired "Aerorace" manual is the best bet, although it won't be exactly right as that model has no heater. Anyway, we fitted the pipes between the bottom connection on the radiator and the water pump before realising that the rest of the pipework will be best done after the exhaust manifold has its final fitting..... which can't be done until after the bodywork's on!
So we moved onto the clutch cable, which was relatively easy once we'd removed the pedal pivot to provide some extra travel on the inner cable so that the grommet on the clutch arm could be pushed over it before being re-fitted to the arm. We now appear to have a working clutch:
| Clutch cable through the grommet in the actuator arm |
| Transducer above the RHS driveshaft bolts |
| Template for the exhaust manifold hole made from the radiator box |
| Gearbox cover plate in (temporary) place |
11th October 2010 - Fuel Pump & Filter
A rare evening visit to the garage trying to make the most of the daylight and relative warmth before the winter. Tonight the target was the fuel pump and filter abandoned previously due to mounting point uncertainty. Following yet more advice from Westfield, we used rivserts again - two under the right-hand driveshaft for the filter, two more just to the right of the diff stabiliser bracket for the pump. Both items had been prepared previously, including changing the connectors on the wiring loom, so mounting them was quite straightforward, if a little time consuming due to the cheapo bent-alumminium brackets. These required the rivserts to be done one at a time to ensure they were in the right place.
Once on, the fuel pipes from the filter to the under-car fuel line, from the filter to the pump and from the pump to the tank were addded:
When we reviewed the job upon completion, we think the fuel pump bracket should be the other way around, placing the pump under the tank. This would make it a bit more vulnerable, but the pipe runs would be straighter. One to think about for next time.
Once on, the fuel pipes from the filter to the under-car fuel line, from the filter to the pump and from the pump to the tank were addded:
![]() |
| Fuel pump & filter in place (pipes and cables still to be covered) |
Subscribe to:
Posts (Atom)


